
How to Upscale a DVD to HD (Free, Step by Step)
To upscale a DVD to HD, rip the disc to a file first, fix the frame shape and film cadence, crop any black bars, then upscale the clean file 2x for a 1080p TV or 3x for a 4K one. The DVD-specific work comes before the upscaling, because a DVD stores its picture in an odd way: 720×480 pixels that are not square, and film that was stretched from 24 to 30 frames a second. Upscale a file that still carries those quirks and you get a bigger file with the same quirks.
DVD is also the best source in this family of "old video" jobs. It's digital from the start, so there's no tape noise or wobble to deal with, only compression and a low pixel count. Set your goal accordingly: a DVD upscaled to 1080p looks cleaner and sharper than the same disc stretched by a TV, but it won't turn into a Blu-ray.
What a DVD actually holds
A DVD stores NTSC video at 720×480 and PAL video at 720×576, compressed with MPEG-2 at up to 9.8 Mbit/s. Professionally encoded movie discs average 4 to 5 Mbit/s and peak at 7 to 8 Mbit/s in busy scenes, with the color detail halved in both directions (4:2:0), according to the DVD-Video specification summary. That's a small picture, squeezed hard.
Two things follow from that, and both matter before you upscale.
The pixels aren't square. The disc flags the picture as 4:3 or 16:9, and the player stretches the 720 stored columns to match. For a widescreen NTSC disc, HandBrake's anamorphic guide gives the factor: pixels 32:27 wide, so 720 columns display as 854×480. A 4:3 NTSC disc displays as 640×480. PAL works the same way with different numbers: 1024×576 for 16:9 and 768×576 for 4:3.
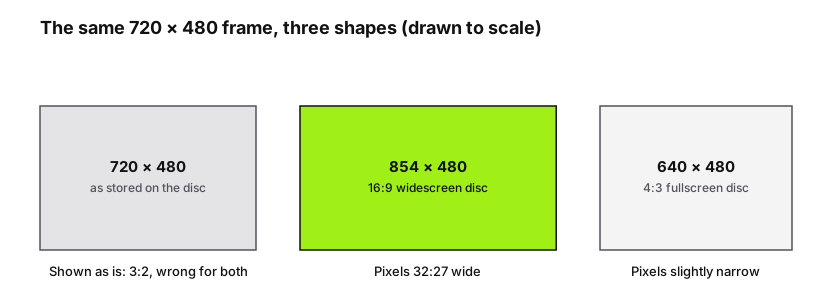
If a ripped file looks too wide or too narrow in a player, the aspect flag was lost. Upscaling the file as it is would lock that wrong shape in.
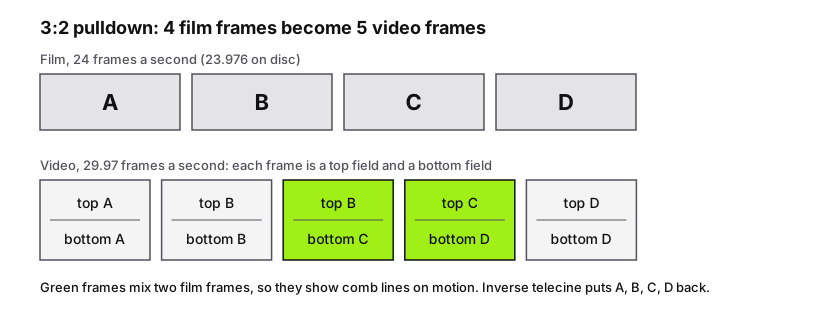
Film was converted to video speed. Movies shot at 24 frames a second reach NTSC discs through 3:2 pulldown: four film frames are spread over ten video fields, making five frames. Two of those five mix pieces of neighboring film frames. PAL discs usually skip all that and just run the film at 25 frames a second, about 4% fast.
Step 1: rip the disc to a file
Ripping means copying the disc's video to your drive as a file. MakeMKV is the usual tool: it copies the main title without re-encoding, so nothing is lost at this stage. A home-burned disc with no copy protection also works with HandBrake, which can read the disc directly.
A short legal note: the rules on copying a copy-protected disc differ by country, and some don't allow it even for a disc you own. Check yours, and only rip discs you have the right to copy.
Pick the main title (the longest one), include the audio track you want, and save it. A feature film comes out at roughly 4 to 8 GB.
Step 2: check whether the film is telecined
Open the file in MediaInfo or a player that shows stream details. What you see decides the next move:
- 23.976 frames a second: the disc stored the film as progressive frames with flags that tell a player how to add the pulldown. Nothing to undo. This is common for film on NTSC discs.
- 29.97 frames a second with comb lines on motion in some frames: the pulldown was baked in. Step through a moving scene frame by frame. If you see two clean frames, then two that look like combs, the cadence is the A A B B B C C D D D pattern drawn below.
- 29.97 with comb lines in every moving frame: true interlaced video, typical of concerts, sitcoms and home recordings on disc. This needs deinterlacing, not inverse telecine.
In HandBrake, the Detelecine filter "removes comb artifacts that are the result of telecine", and its Deinterlace filter (Yadif or Bwdif) handles true interlacing. Don't apply both to one file: deinterlacing a telecined film throws away half the vertical detail of every frame, when inverse telecine would have restored all of it. Hard telecine can go wrong on credits and effects shots that were added at video speed, so scrub through a few scenes after you convert. PAL discs from film need neither, though a few European video-sourced ones are interlaced.
Step 3: crop the bars and fix the shape
Most films are wider than 16:9. A 2.39:1 movie on a widescreen disc keeps its shape by carrying black bars inside the 16:9 frame. In display terms, 854 columns wide at 2.39:1 is 854 ÷ 2.39 ≈ 357 rows of picture, so about 61 of the 480 rows at the top and bottom are black.
Crop those rows before upscaling. The bars aren't free: the upscaler spends work on them and the output file spends bits on them. Cropping gives a picture of 854×358 (an even number, which video encoders need), and the black bars come back for free whenever a player fits it to a 16:9 screen.
At the same time, export the working copy with square pixels at the display size: 854×480 for widescreen NTSC, 640×480 for fullscreen NTSC. That removes any dependence on the aspect flag surviving the next tool in the chain. HandBrake's picture settings do this when anamorphic is set to automatic and the output size is the display size.
Step 4: pick the scale
None of the scales lands on exactly 1080 lines, since 480 to 1080 is 2.25x. Your TV does the last small step. Here is what each scale gives from a square-pixel 854×480 widescreen copy:
| Scale | Output | Good for |
|---|---|---|
| 2x | 1708×960 | A 1080p TV; the TV adds only a 1.125x step |
| 3x | 2562×1440 | A 4K TV; the TV adds a 1.5x step |
| 4x | 3416×1920 | Rarely worth it from a DVD |
For fullscreen NTSC (640×480), 4x gives 2560×1920, which fits the upscaler's 3840×2160 ceiling. On PAL, a 1024×576 widescreen copy can go to 3x (3072×1728), but 4x would reach 4096 pixels wide and isn't offered. A 768×576 fullscreen PAL copy hits the 2160 short-edge limit at 4x, with 3x (2304×1728) the largest you can use.
My recommendation: use 2x for a 1080p screen and 3x for a 4K screen, and stop there. A DVD's detail ceiling is low, and at 4x a 480-line source mostly gets larger blocks, not more picture.
Step 5: cut the film into clips
The free browser upscaler takes clips up to 5 minutes and 150 MB, as MP4, MOV, M4V or WebM. A DVD rip fails both limits at once. Five minutes at the disc's 4 to 5 Mbit/s average is 150 to 188 MB for the video alone, and the file is MPEG-2 in an MKV container, which you'll convert anyway.
Export each working clip as H.264 MP4 at about 3.5 Mbit/s with stereo AAC audio at 192 kbit/s. A full 5:00 clip then lands near 138 MB, inside the cap, and H.264 at that rate is easily enough for 480-line footage. Convert the audio on purpose: DVD audio is usually Dolby Digital (AC-3), and AAC is the safe choice inside an MP4.
A two-hour film is 24 five-minute clips, about 172,000 frames at 23.976 frames a second. That's a real afternoon, and no one should pretend otherwise. Two ways to keep it sane: upscale only the scenes you care about (a wedding video, a school concert, a favorite sequence), or run one clip first and judge before you commit the rest.
Then put the clips through the browser upscaler. It runs on your own GPU, so the disc's contents stay on your computer, and the audio is passed through untouched. AI video upscaling needs a WebGPU browser; without one, the tool offers only a basic resize, labeled as such. If your device offers the slower Enhance mode, test a 30-second dark scene in both modes first. The general 1080p and 4K walkthrough covers the upscaler's settings. Join the finished clips in order in any editor; MP4s with matching size and frame rate join without re-encoding.
What upscaling can't fix on a DVD
MPEG-2 at 4 to 5 Mbit/s leaves its marks: blocky squares in dark gradients, mosquito noise around hard edges, and flat color areas that shift in steps. An upscaler sees those as detail. Pause a night scene or a sky on the finished clip and look: if the blocks have grown, try Enhance on that section, or accept the result and keep that clip at 2x. How far AI video upscaling can rebuild detail depends on what survived compression, and heavy blocking is the case where it can't.
Soft-focus film, small faces in wide shots and text in the picture are limited the same way: the detail was never on the disc. Check the first finished clip on the screen where you'll watch it, because a laptop display hides what a 65-inch TV shows.
One last decision rule: if the disc is a mainstream movie that exists on Blu-ray, buy or borrow the Blu-ray, which holds six times the pixels. Upscaling is for what never left DVD: home-burned discs, local broadcasts, concerts, old series that never got a release, and the family footage someone put on disc years ago. If your footage started on tape before the disc, the guide to old home videos covers the capture side.
Ready to try it yourself? It's free, and your files never leave your device.
Try the free AI video upscaler