
How to Upscale a Screen Recording for YouTube

Upscale a screen recording when your master is 720p or a laptop's odd native size and you want a 1080p or 1440p upload that looks smooth on a big display. Skip it when you can simply record at 1080p: a fresh recording at the right size always beats an enlarged one. For a 1280×720 recording, 2x gives 2560×1440 and 3x gives 3840×2160, which are both sizes YouTube lists as standard.
What YouTube asks for
YouTube's recommended upload settings call for MP4 with H.264 video and list bitrates by size for standard frame rates: 5 Mbps for 720p, 8 Mbps for 1080p and 16 Mbps for 1440p. Its resolution guidance names 1280×720, 1920×1080, 2560×1440 and 3840×2160 as the 16:9 sizes. A different shape is fine: the player resizes to fit, and YouTube advises against adding black bars to your file yourself.
Nothing on those pages says that uploading a larger file makes a small recording look better. Forum threads claim that 1440p uploads often get a more efficient codec and a higher bitrate than 1080p, which can make the same footage look cleaner after YouTube re-encodes it. That's anecdotal and YouTube doesn't document it, so test it yourself: upload once, open the video's "Stats for nerds" on YouTube and check the codec and resolution it served.
Which output size you get
The video upscaler only offers a scale when the result stays within 3840×2160, and it doesn't shrink anything to fit. Sizes are multiplied and rounded to even numbers. Here is what that means for common recording sizes:
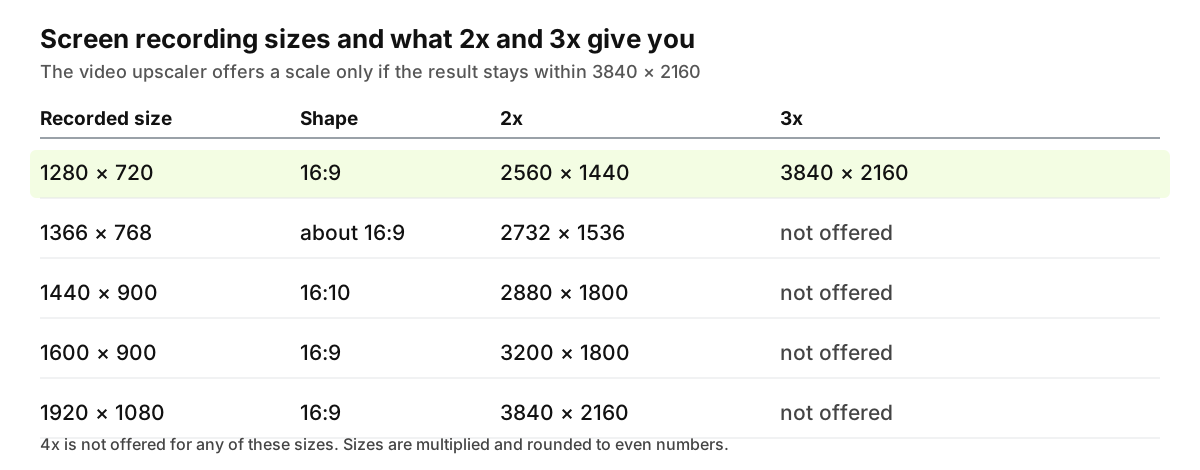
Two things stand out. A 1366×768 laptop screen isn't exactly 16:9 (it is 1.7786, against 1.7778), so 2x gives 2732×1536, a shape slightly off 16:9, and the player adapts to it. And a 1440×900 screen is 16:10: at 2x it becomes 2880×1800, and on a 16:9 display the picture leaves bars of about 5% of the width on each side. Both are harmless, but if you want a clean 16:9 frame, crop to 16:9 in your editor first and upscale the cropped file.
Pick the scale from where the video ends up. A tutorial watched in a browser tab at 1080p needs nothing beyond 2x from a 720p source (1440p). Reserve 3x for 1280×720 recordings headed for 4K, and only if you can see the difference in a test.
What upscaling does to UI text
Small text is the hard case, and it's worth seeing before you commit. A 12 px menu label in a 1366×768 recording has only a few pixels per letter. Subpixel rendering and video compression have already smeared those pixels, so an upscaler has little to work with. It will smooth the edges of buttons, window frames and icons, which look better, and large headings usually improve too. It can't recover letters that were never resolved: on tiny type, expect a cleaner blur, and sometimes a letter that looks confident but is wrong.
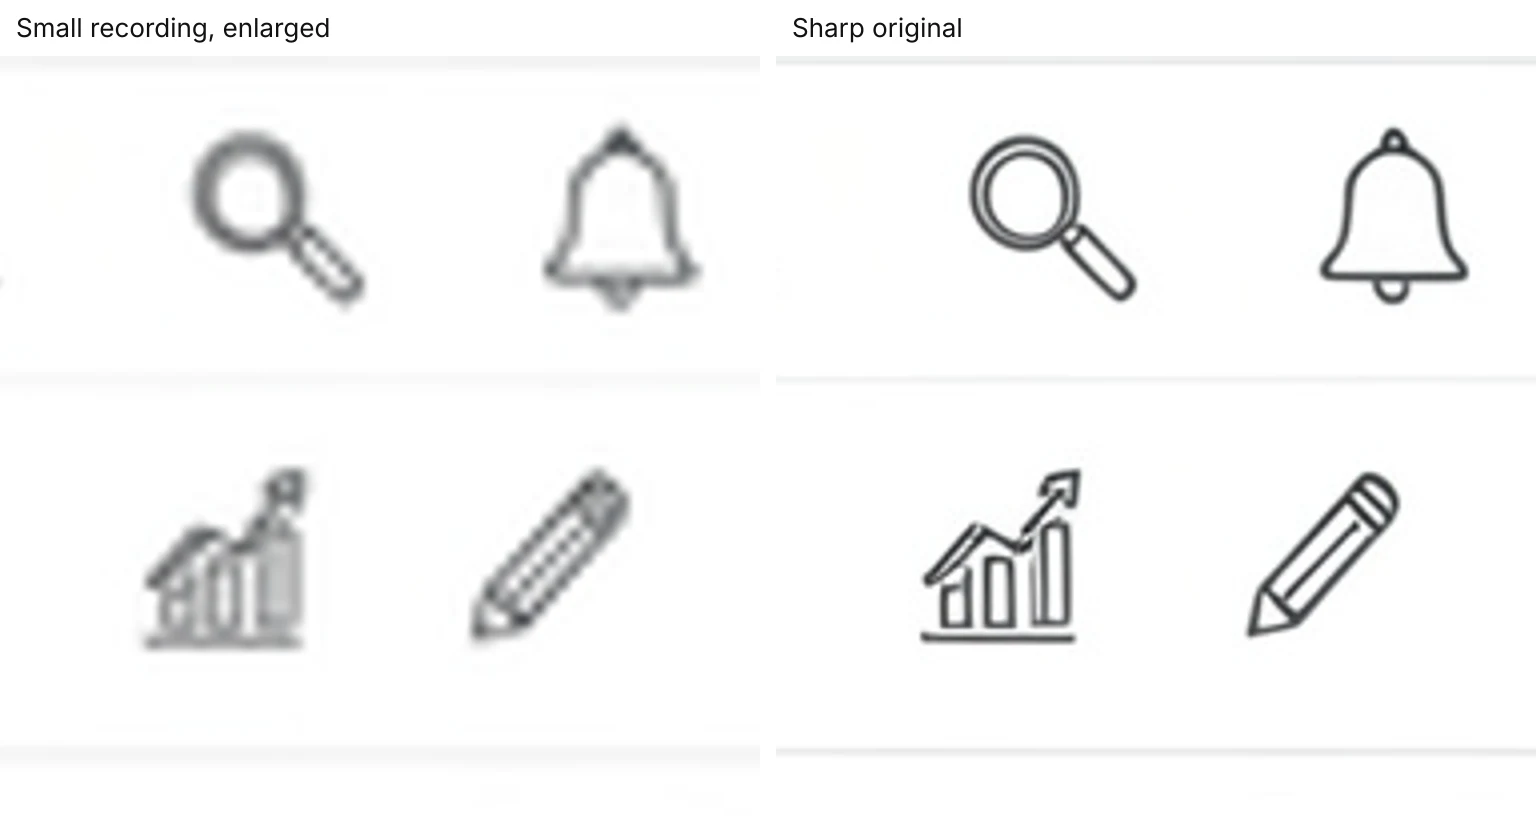
The picture shows what the gap looks like for simple icons: a small recording enlarged keeps the shapes but loses the thin lines. Text has finer strokes than icons, so it loses more.
If your viewers need to read the text, fix it at the source:
- Zoom the app or browser to 125% or 150% before recording, so UI text is larger in the capture.
- Record only the window that matters, not the full screen, so more pixels cover the part people read.
- Lower your display resolution to the size you plan to upload (1920×1080 is the easy case) so the OS draws text crisply at that size.
When re-recording is better
If you control the machine and the session is short, record again at 1920×1080. OBS can also scale while recording (Settings, Video, Output (Scaled) Resolution), but it enlarges with a plain filter you choose (bilinear, bicubic or Lanczos), so a 720p capture scaled up there is no sharper than a basic resize. Real pixels at the target size are the only thing that keeps small text readable.
Upscaling earns its place when you can't redo it: a live demo, a customer's session, an old library of 720p tutorials you want on a 1440p channel, or a recording from a locked-down laptop with a low native resolution. Console and capture-card gameplay captures are a different case, with their own sizes and HUD text.
Steps
- Keep your original recording as the master. Don't overwrite it.
- Export a copy at the recording's native size as MP4, trimmed to the part you need. The upscaler takes MP4, MOV, M4V or WebM, up to 150 MB and 5 minutes of video. Screen recordings are usually small files, so most clips fit; a long tutorial has to be cut into parts.
- Run the recording through the video upscaler, choose 2x (or 3x for 1280×720 to 4K), and compare the first few seconds before you process the rest. It runs on your own GPU in a browser with WebGPU, so a recording of your desktop never leaves your computer. Without WebGPU you only get a basic resize.
- Download the MP4. The frame rate and timing stay the same and the audio is copied across unchanged.
- Join the parts in your editor if you split the clip, then upload and check the result on YouTube once it finishes processing at the higher resolutions.
The full 1080p and 4K walkthrough covers the same flow for general footage, and how AI video upscaling works explains why sharp edges improve more than fine text.
If you only get one test, make it a 20-second section with the smallest text in the recording. If that text isn't readable after 2x, re-record at a larger UI scale.
Ready to try it yourself? It's free, and your files never leave your device.
Try the free AI video upscaler