
How to Upscale Old Gameplay Footage
To upscale old gameplay footage, start from the cleanest capture you have, deinterlace it if it came from a 480i signal, then upscale it 2x or 3x in one pass and keep the frame rate unchanged. A 1280×720 capture at 3x lands exactly on 3840×2160, and a 640×480 capture at 3x gives 1920×1440. Pixel-art games are the exception, and the section on them below explains why.
Why game footage behaves differently
Most video upscaling advice is written for camera footage. Game footage has four traits that change the advice:
- Hard edges everywhere. Polygon borders, sprites and menus have no natural softness, so any blur from capture or compression shows. The upside is that edges are what a video upscaler improves most.
- HUD text. Health bars, subtitles and score counters are small, high-contrast and often fixed on screen for minutes. They are the first thing a viewer reads and the first thing to look wrong.
- Fast motion. Camera pans in a racing or shooter game smear detail between frames, and encoders spend bits badly on them. A frame that looks soft in motion can be sharp when paused.
- Often 60 fps. The tool keeps every frame and its timing, so a 60 fps capture stays 60 fps and costs twice the frames of a 30 fps clip at the same length.
If your footage came from a desktop recording of a modern game instead of a console or capture card, the screen recording guide has the output-size tables for that case.
Know what your console actually output
Older consoles didn't output "480p". Wikipedia's 240p article explains that fourth- and fifth-generation consoles, including the Sega Saturn, PlayStation and Nintendo 64, mostly used a progressive low-resolution mode of 240 lines (288 in PAL regions), and that the Super NES had a mode with frames of only 262 lines. It lists 256×224 for the NES in NTSC regions and 320×240 as a common square-pixel size. Later consoles such as the Xbox 360 offered 480i, 480p and 720p, per the community ConsoleMods table.
Your capture file may not match any of that. A capture card or an HDMI converter often outputs 480p or 720p whatever the console sent, and the quality depends on how it converted the signal. Check the real size of your file (any video player's info panel shows it) and use that number:
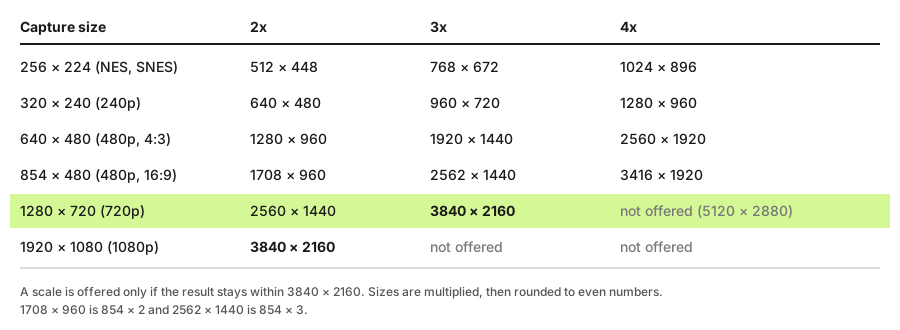
The video upscaler only offers a scale when the result stays within 3840×2160, and it never shrinks a result to fit. That is why 1080p captures allow just 2x and 720p captures stop at 3x.
Deinterlace before you upscale
If the signal was 480i, each frame is two half-pictures captured a field apart, and fast motion shows comb stripes along moving edges. An upscaler treats those stripes as detail and sharpens them. Deinterlace first, ideally to double-rate (60 progressive frames from 60 fields). YouTube's own upload guidance says the same: deinterlace before uploading. The steps are covered in the home video guide, and they apply to a PlayStation 2 capture just as they do to a tape. A 240p capture is already progressive and needs no deinterlacing.
What upscaling does to polygons, sprites and HUD text
3D games from the PlayStation 2 and early Xbox era respond well. Texture edges, polygon silhouettes and long straight lines get cleaner, and jagged stair-steps on diagonals soften. Original textures stay as blurry as they were. The upscaler sharpens what the capture contains and can't paint in a texture the game never had.
HUD text is mixed. Large, bold lettering improves. A 7-pixel-tall subtitle in a 320×240 frame doesn't have enough pixels for letters to be reconstructed, so expect rounder, cleaner blobs, and occasionally a letter that reads as a different one. Watch the HUD in your test clip before you process anything longer. If the text matters (a speedrun timer, a tutorial), consider covering it with a clean overlay in your editor instead.
2D sprite games are the awkward case, covered next.
Pixel art: pick a whole-number scale first
An AI upscaler is built to turn blocky edges into smooth ones. On pixel art that is the opposite of what players want: sprites lose their crisp square pixels and gain soft, rounded outlines. If the look of your game is the pixels, you probably want nearest-neighbor scaling by a whole number, which makes every source pixel an identical square.
Whole numbers matter because of how screens divide. A 256×224 frame on a 1080p screen:
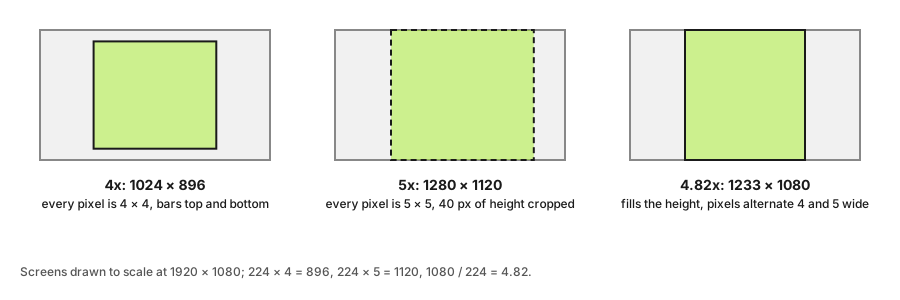
At 4x each source pixel becomes 4×4, and the frame is 1024×896 with bars. At 5x it is 5×5 and the frame is 1120 px tall, 40 px more than the screen, so you crop 20 px top and bottom. Fitting the height exactly needs 4.82x, so some pixels become 4 wide and some 5, which shows up as shimmering in scrolling scenes. The RetroRGB scaler notes make the same point about non-integer scaling of 2D games.
A reasonable workflow is to scale 2D footage in your editor by a whole number with the interpolation set to nearest-neighbor, then place it on a 1080p or 4K canvas. Reach for an AI upscaler on pixel art only when you want a deliberately smoothed, "remastered" look, and compare a short clip first.
Steps for 3D and mixed footage
- Keep the original capture as the master.
- Check its size and whether it is interlaced (pause on a fast pan and look for comb stripes). Deinterlace if so.
- Cut a 15 to 20 second test clip with fast motion and on-screen text.
- Upscale the capture at 2x, or 3x for 720p to 4K. It runs on your GPU in a browser with WebGPU, so footage of unreleased or private sessions never leaves your machine. Without WebGPU you get only a basic resize.
- Compare the HUD and a camera pan in the result against the original before you process the whole file.
- For uploads, match YouTube's recommended bitrates for high frame rate video: 12 Mbps for 1080p60, 24 Mbps for 1440p60, and 53 to 68 Mbps for 2160p60. YouTube also says to upload at the frame rate you recorded.
Limits to plan around
The tool accepts MP4, MOV, M4V or WebM up to 150 MB and 5 minutes of video. A 150 MB file over 5 minutes is about 4 Mbps, so a high-bitrate 60 fps capture can pass the size cap before it passes the time cap. A two-hour session has to be cut into pieces of 5 minutes or less. Cut at scene changes, such as a loading screen, so the join isn't visible, and join the upscaled parts in your editor.
Upscaling doesn't fix a bad capture. Dropped frames, a washed-out HDMI converter and banding from a low-bitrate recording all pass through, and sometimes look worse at the larger size. For general background, what AI video upscaling can and can't fix lists the failure cases, and the 1080p and 4K walkthrough covers the same flow for any footage.
If you have a choice, recapture the game with a better converter before upscaling: a clean 480p capture upscaled beats a muddy 720p one.
Ready to try it yourself? It's free, and your files never leave your device.
Try the free AI video upscaler