
How to Upscale an Image Without AI
You can upscale an image without AI by resampling it: the editor stretches the pixel grid and fills the new pixels with a formula. Use bicubic for photos, nearest neighbor for pixel art, and expect a larger but softer image, because a formula can only blend pixels that already exist.
That matters if you need a copy where nothing is invented (an archive scan, a document, evidence), or if you are enlarging by a small step like 1.25x. For everything else, read the last section before you pick.
What each resize method does to an edge
Every method answers the same question: a new pixel sits between old ones, so what color does it get?
Nearest neighbor copies the closest old pixel. Nothing is blended, so edges stay hard and every pixel becomes a visible square. Bilinear averages the four nearest pixels, which smooths the squares into a soft gradient. Bicubic looks at a 4 x 4 neighborhood (16 pixels) and fits a smoother curve through it, so edges keep a little more snap than bilinear. Lanczos uses an even wider window and a sharper filter shape. It can overshoot on very hard edges and leave a faint light or dark halo, which is the price of the extra crispness.
We enlarged the same 64 x 64 px crop of a dog's nose 4x (to 256 x 256 px) with each method:
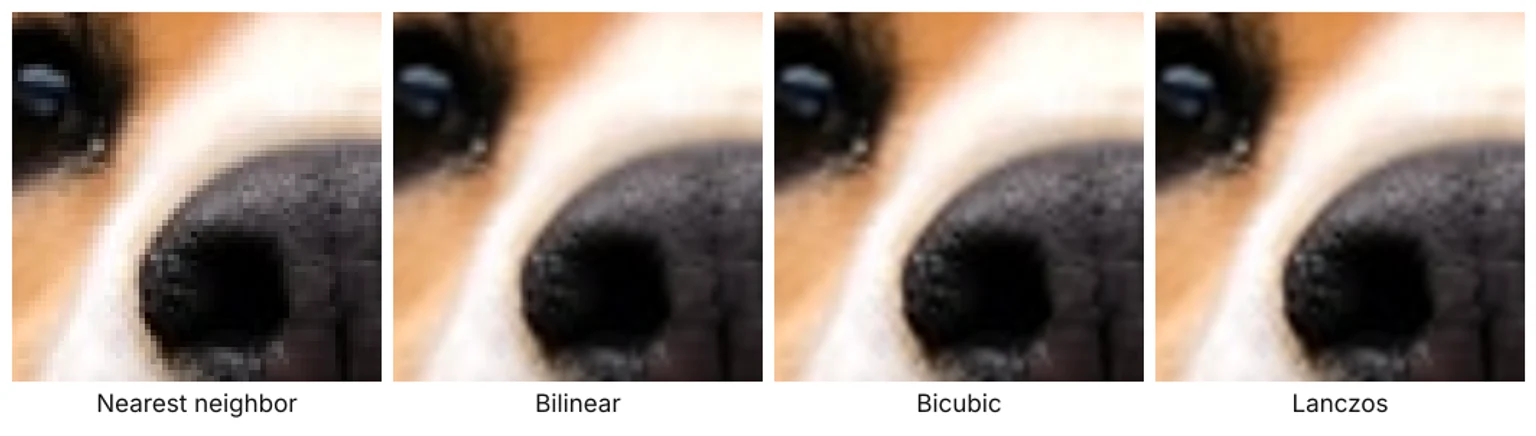
Nearest neighbor is the only one that looks like a different kind of picture: the whisker dots and the eye highlight turn into squares. The other three are close. Bilinear is the softest. Bicubic and Lanczos look almost the same at this size, and we could not point to a halo in the Lanczos panel. A published comparison on electron micrographs also found bicubic and Lanczos visually very close.
No method added detail. The nose has the same texture it had in the 64 px crop, just spread over more pixels. That is the whole story of non-AI upscaling: the file gets bigger and the picture does not get sharper.
Where to find these options
Photoshop. In Image > Image Size, tick Resample and open the dropdown beside it. Adobe's resampling options page lists Nearest Neighbor, Bilinear, Bicubic (smooth gradients), Bicubic Smoother (for enlarging), Bicubic Sharper (for reducing) and Preserve Details 2.0. Preserve Details 2.0 is Adobe's own enlargement mode with a noise slider. Treat it as its own category, not a plain interpolation, and check the results the way you would any enhancement.
GIMP. Image > Scale Image has an Interpolation menu with five choices: None, Linear, Cubic, NoHalo and LoHalo (listed in the GIMP developer docs). None is nearest neighbor and Cubic is bicubic. NoHalo and LoHalo are GIMP's own higher-quality variants for resizing photos.
Preview on a Mac. Tools > Adjust Size has a Resample image checkbox (Apple's Preview guide) and no way to choose the method. The checkbox decides whether pixels are added at all. Fine for a quick 1.5x, not for pixel art.
Pixel art and line art: use nearest neighbor at whole-number scales
A smoothing method is the wrong tool for a sprite, because the squares are the picture. We drew an 8 x 8 px sprite and enlarged it 48x two ways:
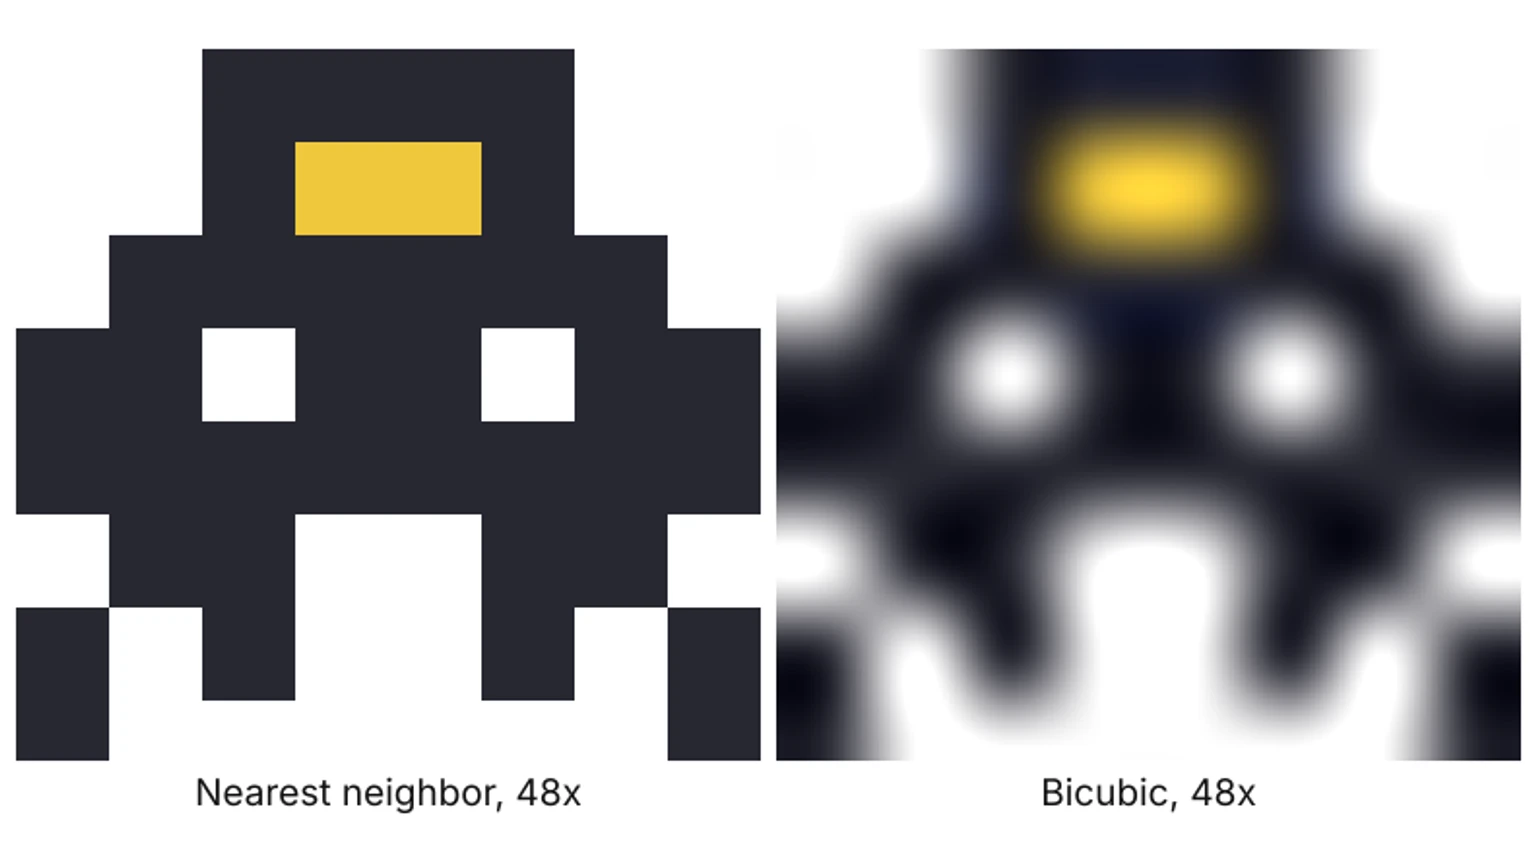
Nearest neighbor keeps every edge exact. Bicubic blurs the outline into a halo and pulls the dark pixels into the white ones. The same holds for QR codes, line drawings and flat UI: small flat shapes with hard edges survive a blocky enlargement and do not survive a blur. Text in screenshots follows the same logic, with extra problems from compression.
Stick to whole-number scales (2x, 3x, 4x). At 2.5x, nearest neighbor repeats some source pixels two times and others three, so identical parts of the sprite come out in different widths.
When a non-AI resize is the right call
- Nothing may be invented. Forensic work, archival copies, scientific images and legal exhibits all need output where every pixel traces back to the source. An AI model fills in plausible texture, which is the opposite of that. Keep the original file and resize a copy.
- Pixel art and flat graphics. See above.
- Small steps. Going from 1600 to 2000 px wide (1.25x) asks very little of any method, and bicubic does it cleanly.
- Speed in a batch. A resample runs in milliseconds, with no model to load.
When AI does better
Bicubic cannot make a 640 px photo look like it was shot at 2560 px. It can only make a bigger soft picture. An AI upscaler is trained on pairs of low and high resolution images, so it predicts texture such as fur, brick grain, skin pores and text edges instead of averaging pixels. How that works is a separate topic, but the practical difference is easy to see: run the same photo through both and zoom to 100 percent.
The trade-off is honesty about what is real. The AI result contains detail the camera never recorded, and on tiny faces or compressed text it can be confidently wrong (a field guide to AI artifacts shows what to look for). For a photo you are going to show people, upscale the same photo with AI and compare it with your bicubic copy. The free tool offers 2x and 4x and processes the file on your own device, so there is no cost to comparing. For picking between those two scales, 2x vs 4x has a decision rule, and the general guide to clean enlargements covers the full workflow.
Decision rule: if you can name a reason every pixel must be real, or the image is pixel art, resample and keep the original. For any photo that will be viewed, compare both and keep the one that looks right at 100 percent.
Ready to try it yourself? It's free, and your files never leave your device.
Try the free AI image upscaler